craft

DIY Jewelry Display

Hello World,

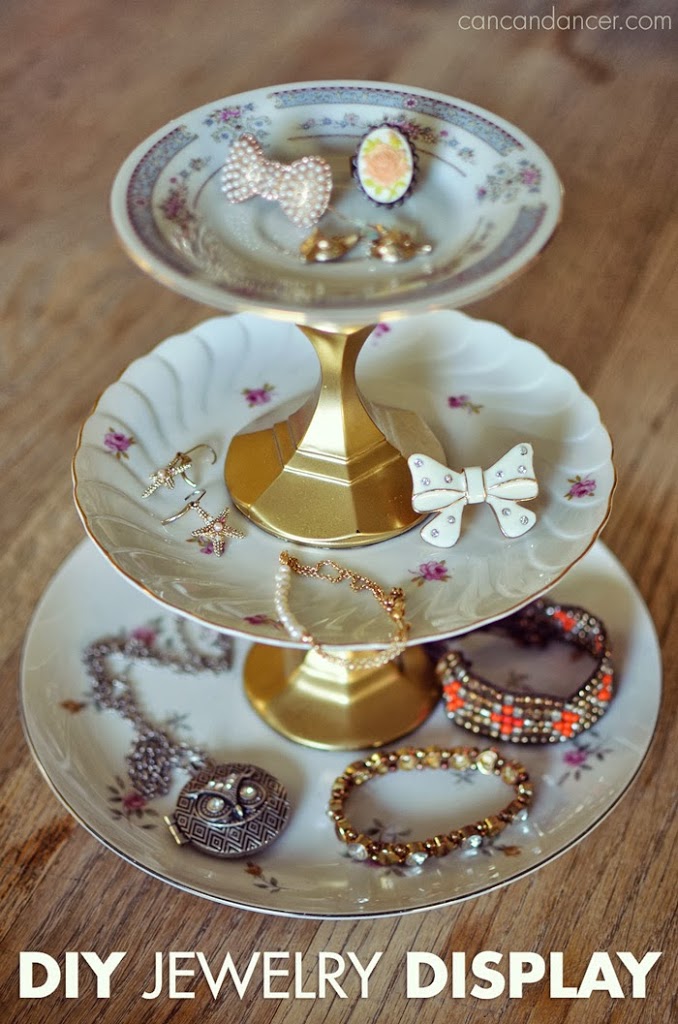
Have you seen those darling jewelry stands made with vintage plates at consignment shops or craft fairs, but not wanted to fork over $25-$40 for one? Well, I went thrifting, and found 3 plates and 2 candle sticks for less than $4!

Check out the tutorial below, to make one of your own:

1. Gather your supplies: vintage plates, candle sticks, E6000 or caulk, and spray paint if you don’t like the color of your candle sticks. (Maybe, I bought more plates than I needed, but some of them were only $0.35 each!)

2. Remove any stickers, wash and then dry your candle sticks and plates. Spray paint your candle sticks if you wish, I’m on a gold kick lately.

3. Decide on which plates to use. I used 3 different sizes so my display, with the smallest plate on top.

4. Apply a nice amount of E6000 or caulk to the bottom of your candle stick, and place that baby down on the top of your first plate.

5. Apply E6000 or caulk to the top of that candle stick, and then place your next plate on top of it.

6. Repeat for the last candle stick and plate.

7. Allow to dry overnight and then enjoy!

Happy Crafting!

Wine Cork Magnets

Hello World,

I like to collect wine corks. I love the texture, the unique designs, and how great they are as a craft material. I really want to make a cork board someday, but collecting them authentically is taking me what feels like forever. So, if you are like me and want a project that can be done with limited wine corks, here is a project for you:

corkss

Wine cork magnets. Simple right? Check out the tutorial below:

1. Gather your supplies: wine corks, an adhesive magnet sheet, and a box cutter / x-acto knife.

2. Carefully, cut your wine cork in half lengthwise.

3. Cut your magnetic sheet to the same size as your wine cork.

4. Peel off the paper backing and stick the magnetic to your wine cork.

That’s it. Wam bam, you have some unique magnets!

If you want to be really thrifty, repurpose magnets (say the ones you get from Dominos or your dentist) and just glue them to the back of your corks. These could be a cute gift for a birthday, bachelorette party, anniversary (especially if the cork held significance).

Happy Crafting!

Glitter & Stud Your Phone Case

Hello World,

I have a Google Nexus, and finding cases for it can sometimes be a challenge. I decided to spruce up my plain case with two of my favorite things- glitter and studs. Check out the tutorial below for this super simple DIY project:

phone-case2

1. Gather your materials: a phone case, Mod Podge, glitter, clear spray paint, a paint or foam brush, flat-back studs, and E-6000.

2.  Place your phone case on top of a paper plate. I used a paper plate so that I could funnel my leftover glitter back into the container.

3.  Apply your first layer of Mod Podge.

4.  Cover that baby with glitter.

5.  Allow to dry, then add another layer of Mod Podge.

6.  Add more glitter. I used black glitter on a black case so if I missed spots it wouldn’t be as noticeable.

7.  Allow to dry. Spray with clear spray paint to waterproof it.

8.  Glue on your studs (in a ventilated area). Mine were from a clearance bin at Michael’s and were meant to be ironed on… but they were only $0.50.

9.  Allow everything to dry overnight. In the last picture above, everything was still a little tacky because I was impatient.

Tada! You have a personalized case! Other DIY case ideas could be to use: images, scrapbook paper, rhinestones, etc. Once I find another cheap case for my phone, I really want to make one completely covered with pyramid studs.

Happy Crafting!