Year: 2014

Wanderlust

DSC_00862 copy

Hello World,

Instead of a DIY tutorial, I’m going to share a little life update about what I’ve been up to. I recently road-tripped to Seattle with my best friend to see Lana Del Rey and Lady Gaga. I was happily surprised by how amazing Lana sounded live, but I sadly don’t have any photos of her because Google Maps drained my phone on the way to the arena. Lady Gaga ended up canceling her concert due to bronchitis, and rescheduled later this summer.

Last summer I bought my first DSLR, and this was my first road trip with it, so you know I was snap-happy. Take a looksie:

DSC_00942 copy
The day before our road trip, we went on a hike around Lake Pend Oreille.
DSC_01022 copy
The next day we started our PNW adventure, and crossed the Columbia.
DSC_01072 copy
We detoured north and explored Leavenworth. Even the Starbucks and Subway matched the Bavarian theme!
DSC_01142 copy
For lunch we ate giant pretzels, gingerbread cookies, and other not-so-healthy items. 🙂
DSC_01212 copy
Next up, Seattle.
DSC_01612 copy
We visited the Woodland Zoo, and almost every animal was active except the lion.
DSC_01322 copy
.
DSC_02132 copy
.
DSC_02332 copy
My wanderlust had been kicking in pretty heavy lately, so after the concert, we took a nice detour to visit the ocean. I love the ocean: the sounds of seagulls and water crashing into the shore, the smell of salt in the air, how endless it appears.
IMG_20140601_171336 copy
On the trip home, we had no cell service in some areas, so we found directions the old-fashioned way.
DSC_02462 copy
We took White Pass on the way home, and it such a perfect view on Mt. Rainier. Its summit is over 14,000 ft!

Do you have any fun travel plans for this summer?


How to Re-Wick Candles

How to Re-Wick Candles

Hello World,

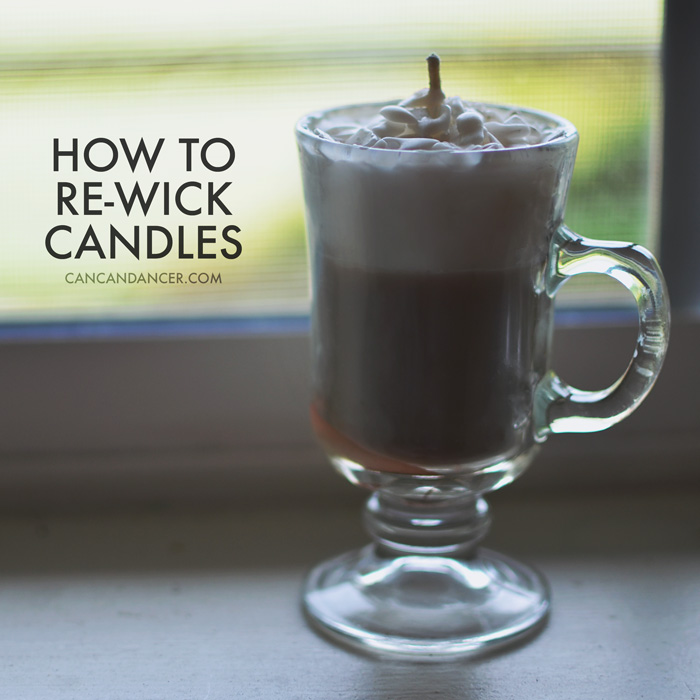
I love buying candles, but I dislike how there is always unused wax in the bottom of the containers. In the past, I have melted the wax and used it in a wax warmer, but lately I have instead been re-wicking my candles, so I can light them again. Check out the simple tutorial below:

How to Re-Wick Candles

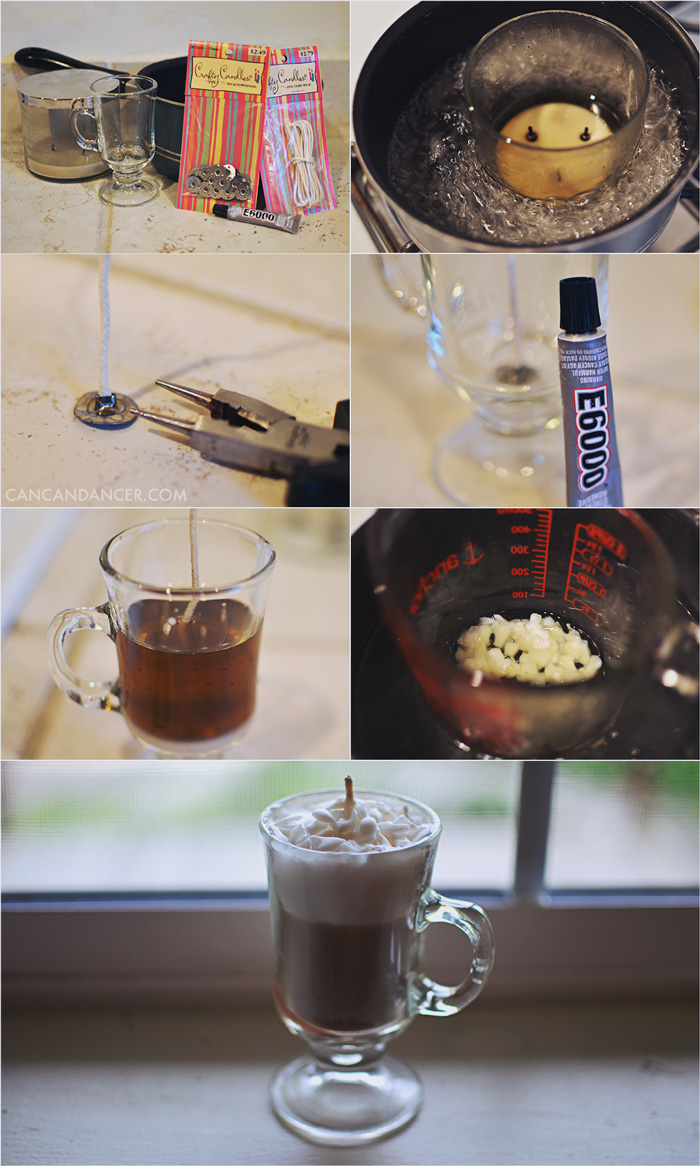
1. Gather your supplies: a burned down candle, wicks, wick bases, pliers, strong glue (I used e6000), a glass container, and a pot partially filled with water, and an oven mitt.

2. Place your burned down candle in the partially filled pot of water. Allow water to boil and wax to completely melt.

3. Crimp your wick base to your wick threading with pliers. (Use the appropriate thickness of wick, if you use on e that is too thick, you risk the chance of your glass container cracking while the candle is burning).

4. Glue this wick to the base of your glass container. Allow to set.

5. Carefully pour your melted wax into your glass container. Wipe out your old container with a paper towel if you want to repurpose it.

6. Steady your wick if it has shifted crooked. You can tape the tip to a pencil if you are worried it will shift as the wax cools.

7. Optional: I bought soy wax flakes, and partially melted some of them and scooped them on top of my cooled, re-wicked candle, to create a candle that resembled an irish cream drink.

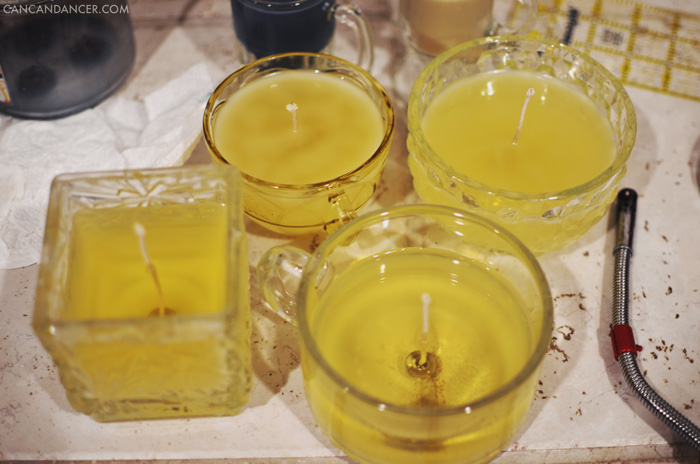
I also recently went thrifting, and picked up a few glass containers for $0.10 each and made some of my own candles with them. Making candles is so much cheaper than paying $20 each for them in the mall!

candles

Happy Crafting!

DIY Cut-Off Tank

muscleteeintro2

Hello World,

I recently went to Kohl’s and saw some cut-off tanks with weaved armholes for $20+. Instead of buying one, I decided to reconstruct a tee I never wear anymore. This project is a quick way to give an old shirt new life, and it doesn’t require any sewing! Check out the simple tutorial:

DIY Cut-Off Tank

1. Gather your supplies: a t-shirt, scissors, and t-shirt yarn or scrap jersey cut into two long, stretched strips.

2. Cut the sleeves off of your shirt. For an exaggerated armhole, cut more of the shirt away.

3. Cut small, equally-spaced slices along the raw edge of each armhole, at least 0.25″ away from the edge.

4. Starting at the bottom of your arm hole, feed your t-shirt yarn each slice until you reach your starting point. Tie a knot with the other tail end, tails aiming towards the inside of your shirt.

5. Repeat with the other armhole and tada!

Pair it with your favorite bandeau, wear it as a work-out tank, or whatever floats your boat! Want to spruce it up even more? Customize it with a freezer-paper stencil or paint it with water-downed bleach.

Happy crafting!