Uncategorized

DIY Glitter “Mr. & Mrs.” Letters

DIY Glitter "Mr. & Mrs." Letters

Hello World,

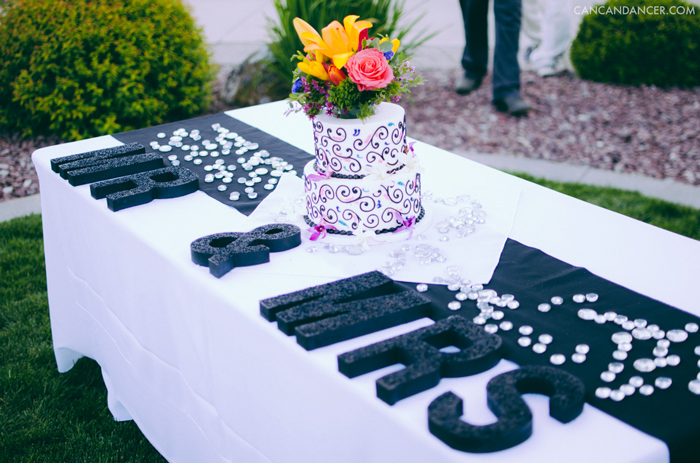
Last month, I went to two weddings in the same weekend, 400 miles apart. One of the weddings was a rainbow theme, with black and white accents. As my gift, I made the glitter “Mr. & Mrs.” letters (in the photo above) that were used as decor on the sweetheart table.

DIY Glitter "Mr. & Mrs." Letters

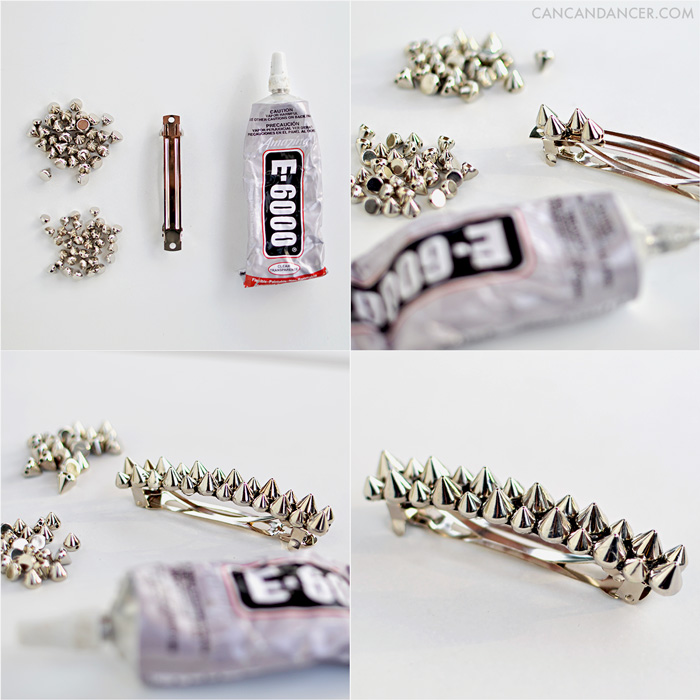
1.  To make your own glitter letters you will need: large wooden letters, glitter, paint the same color as your glitter, a paintbrush, a paper plate, and Mod Podge or a spray fixative.

2.  Begin by completely painting your wooden letters. Painting your letters the same color as your glitter helps so you need less layers of glitter later.

3.  Allow paint to dry, and place your first wooden letter on your paper plate.

4. Apply a thin coat of Mod Podge to your letter. (I didn’t have all my supplies, so I applied another layer of wet paint.)

5. While still wet, completely cover the front of your letter with glitter.

6. Apply another layer of Mod Podge to your letter, and add another layer of glitter. (I didn’t have Mod Podge, so I actually used hair spray (with the windows open). I sprayed the letter, and quickly sprinkled more glitter on my letter.)

7. Once you have reached your desired amount of glitter, add one final coat of Mod Podge to help reduce glitter fall off. (I used one final coat of hair spray.)

8. Funnel your excess glitter (on the paper plate) back into your original glitter container. Allow to dry and repeat with your other letters.

Mod Podge would usually be the way to go, but in a pinch, hair spray works like a charm. I would recommend making them outside though as some glitter does wisp into the air, so there is some clean-up involved.

Rainbow-Themed Wedding

Close up of their cake.  Love the flowers on top. Especially that rose- it was so photogenic.

Rainbow-Themed Wedding Cupcake Tower

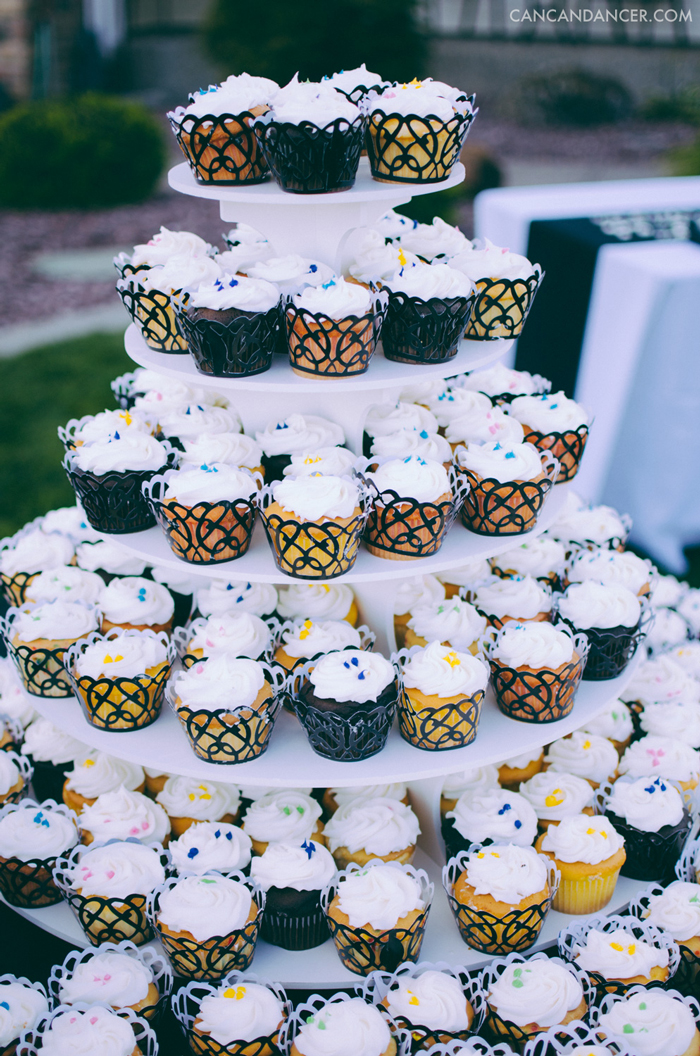
While the cake was for the bride and the groom, they had this great tower of cupcakes for the weddings guests. They had five different flavors, each with a different piped filling.

Happy Crafting!

DIY Floral Letter

DIY Floral Letter

Hello World,

Want to know why I love DIY-ing so much? It’s an affordable and fun way to create items that are totally custom to your unique style! I love projects that I can make while watching a movie. Today’s project is just that! I had everything except the fake flowers in my craft stash, so this project only cost me $3.00 to make.

Check out the tutorial below:

DIY Floral Letter

1. Gather your supplies: fake flowers (I bought mine at Dollar Tree), cardboard, scissors, a writing utensil, and an adhesive. I took a photo of e6000, but didn’t want to wait for it to dry, so I switched to hot glue at the last minute.

2. Draw out your letter on your cardboard and cut it out.

3. Pop the leaves and flowers off of your fake floral stems.

4. Cover your letter with a base layer of the fake leaves. Glue each of them in place.

5. Glue your large flowers to the letter.

6. Continue gluing flowers to your letter until it is nice and full. I also glued some vintage-style keys to mine.

7. Prop on a shelf or glue some string to the back so you can hang it. And enjoy!

DIY Floral Letter

This could be a cute project to do with your initials, a decorative monogram, or an entire word.

Happy Crafting!


DIY Spiked Barrette

DIY Spiked Barrette

Hello World,

I’m a sucker for studded/spiked accessories and clothing. Like a lion on the prowl, I hunt for edgy pieces and beeline for that little sliver of metal peeking out in a rack full of clothing. Lately though, I have been having a harder time finding decent spiked accessories in my area, as many of the fast fashion stores have been pushing the floral trend instead. (Tangent- I recently went to Lana Del Rey’s concert in Seattle and it seemed like every third girl was wearing a floral crown. Her opening act even commented on it. Virtual high five to those of you who DIY-ed your headwear.)

Luckily, I stumbled across (and oh course had to buy) these sweet spikes on Darby Smart, and DIY-ed my own spiked barrette. Check out the simple tutorial below to make your own:

DIY Spiked Barrette

1. Gather your supplies: flat-back spikes, e6000 or other durable glue, and a barrette.

2. In a ventilated area, glue each of your spikes to your barrette. Use as little or as many spikes as you wish. I crammed as many on as possible and alternated the two sizes on mine.

3. Allow to dry, and tada! Pop that baby in your hair and rock your day.

Happy Crafting!

PS – I also used some of these spikes to make some DIY constellation art. See the tutorial here.