DIY

Wine Cork Magnets

Hello World,

I like to collect wine corks. I love the texture, the unique designs, and how great they are as a craft material. I really want to make a cork board someday, but collecting them authentically is taking me what feels like forever. So, if you are like me and want a project that can be done with limited wine corks, here is a project for you:

corkss

Wine cork magnets. Simple right? Check out the tutorial below:

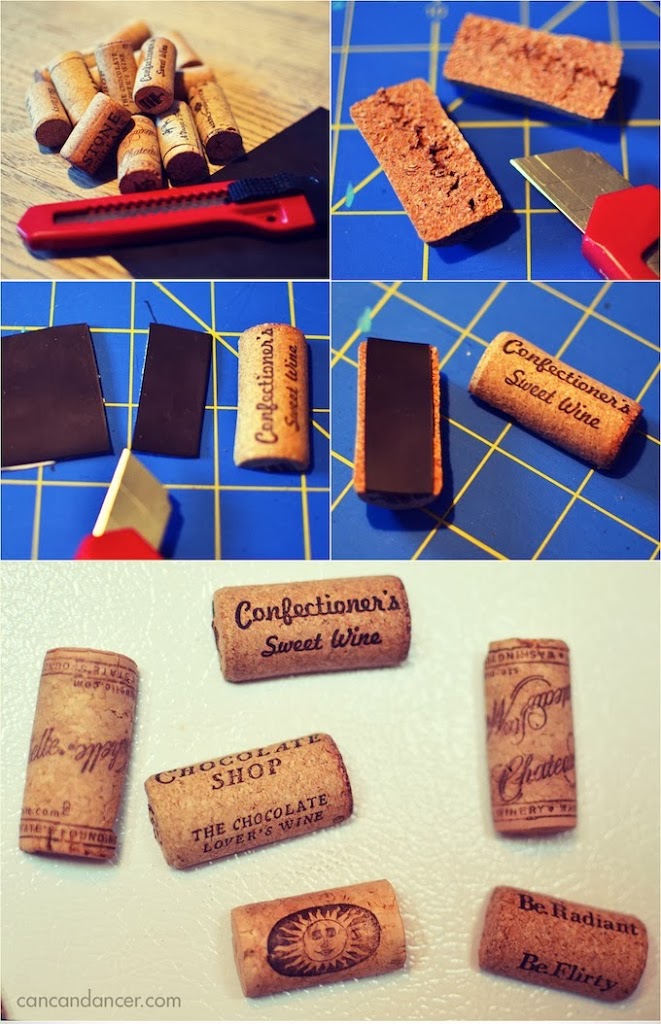
1. Gather your supplies: wine corks, an adhesive magnet sheet, and a box cutter / x-acto knife.

2. Carefully, cut your wine cork in half lengthwise.

3. Cut your magnetic sheet to the same size as your wine cork.

4. Peel off the paper backing and stick the magnetic to your wine cork.

That’s it. Wam bam, you have some unique magnets!

If you want to be really thrifty, repurpose magnets (say the ones you get from Dominos or your dentist) and just glue them to the back of your corks. These could be a cute gift for a birthday, bachelorette party, anniversary (especially if the cork held significance).

Happy Crafting!

Glitter & Stud Your Phone Case

Hello World,

I have a Google Nexus, and finding cases for it can sometimes be a challenge. I decided to spruce up my plain case with two of my favorite things- glitter and studs. Check out the tutorial below for this super simple DIY project:

phone-case2

1. Gather your materials: a phone case, Mod Podge, glitter, clear spray paint, a paint or foam brush, flat-back studs, and E-6000.

2.  Place your phone case on top of a paper plate. I used a paper plate so that I could funnel my leftover glitter back into the container.

3.  Apply your first layer of Mod Podge.

4.  Cover that baby with glitter.

5.  Allow to dry, then add another layer of Mod Podge.

6.  Add more glitter. I used black glitter on a black case so if I missed spots it wouldn’t be as noticeable.

7.  Allow to dry. Spray with clear spray paint to waterproof it.

8.  Glue on your studs (in a ventilated area). Mine were from a clearance bin at Michael’s and were meant to be ironed on… but they were only $0.50.

9.  Allow everything to dry overnight. In the last picture above, everything was still a little tacky because I was impatient.

Tada! You have a personalized case! Other DIY case ideas could be to use: images, scrapbook paper, rhinestones, etc. Once I find another cheap case for my phone, I really want to make one completely covered with pyramid studs.

Happy Crafting!

T-shirt Quilt

Hello World,

After graduating college, I realized how many t-shirts I had. Most of them were just sitting in a bin for three months not being worn. So, I used them all to make a t-shirt quilt.

I was a crazy person and decided to make the quilt in a day, instead of doing it gradually over time. I spent 2.5 hours cutting up the shirts and 2 hours ironing on interfacing. I have a love-hate relationship with fusible interfacing. It takes a lot of patience, but is very necessary to sew stretch and non-stretch fabrics together.  The rest of my time was spent problem solving and sewing. I finished this quilt in 11 hours straight.

When I was making the layout I used a randomized layout. I did this instead of following a grid, since my shirt designs were all different sizes. This made the project a little more difficult, since I had to somehow make all the shirts fit.

The back of the quilt is blue/grey leopard fleece that I bought for 60% off at Jo-Ann’s. If you make a quilt and use fleece, I suggest you buy an industrial needle for your machine. I forgot to and snapped a needle midway through.

DSC_0406

I killed 42 t-shirts/totes/sweatshirts to make this baby, and now have a queen-sized quilt to use for winter. I hide the quilt under my damask comforter because it throws off the look of my room, but it’s nice to cuddle up in a little nostalgia.

(In case anyone was wondering, I used 3 yards of fleece and 8 yards of fusible-interfacing to make my quilt. I would suggest you buy more interfacing than you need. Then you don’t have to be as stingy when ironing your shirts to it like I had to.)

Happy Crafting!