crafting

DIY String Art

Hello World,

It seems that thrift shops have been raising their prices. I used to come home with a bag full of finds almost every time I went shopping, and now I tend to only buy one or two items. I was in luck last week though, when I found this wooden plaque for only $0.25!

I originally was going to hand paint a design on it, but decided to switch it up and make some string art instead. Check out the tutorial below to see how to make your own:

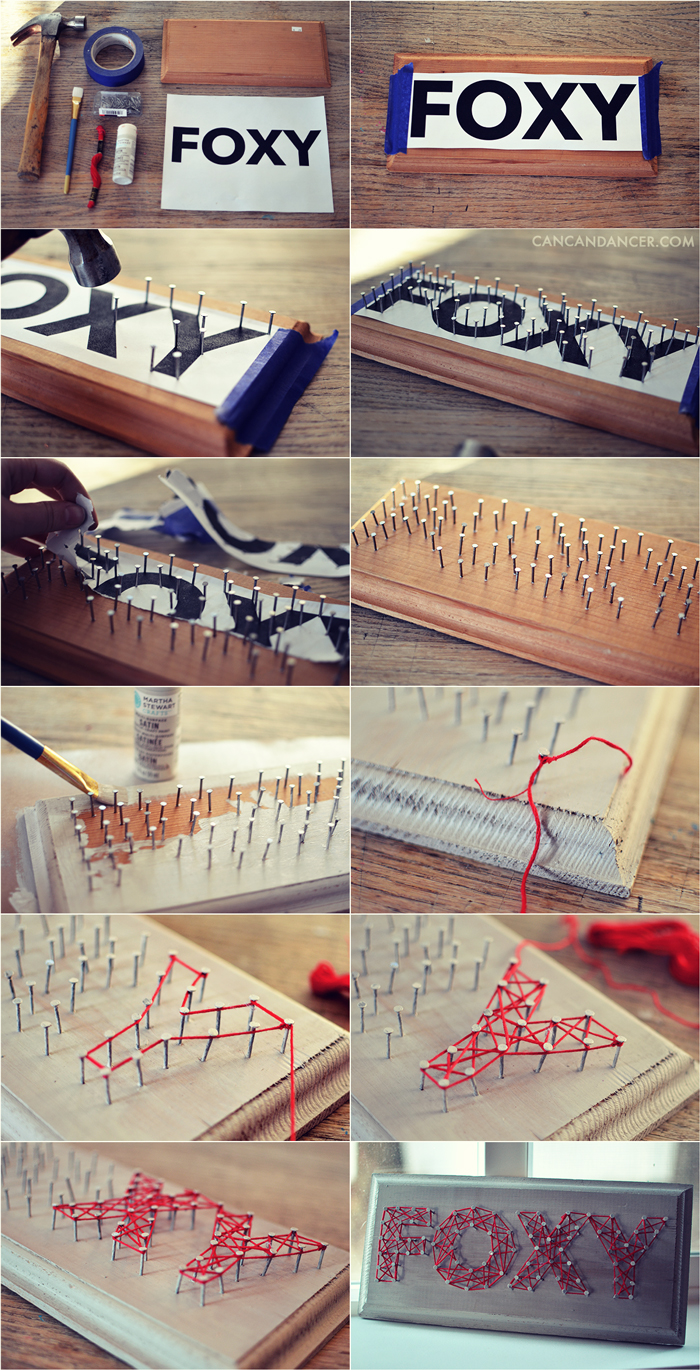
stringart1

1.  Gather your supplies: wood, metal nails, hammer, embroidery floss, a printed design, tape, paint, and a paintbrush.

2.  I used Avenir ® Next Bold for my design and decreased the kerning around the ‘O.’ I printed it, trimmed my paper, and taped it down to my wood.

3.  I hammered nailed into the corners of my letters first. Make sure you hammer your nails deep enough into your wood. I had a few of mine come loose, and I had to teach them a lesson.

4.  After securing the corners of my letters, I eyeballed the spacing and added more nails to each letter.

5.  Remove your paper at this point.

6.  If you have any paper pieces leftover that are difficult to remove with your bare hands, use some tweezers to remove them.

7.  I painted my wood and nails at this point because I wanted them the same color. If you don’t care about your metal nails standing out, it would be better to paint your wood prior to hammering all your nails in place.

8.  Tie a knot around a corner nail. Twist the tail end of your thread around the rest of your thread to secure it.

9.  Outline each letter by working your thread around the outer edge of your nails.

10.  Fill in each letter by randomly wrapping your thread around the nails, pulling tight the entire time. Tie a knot around a nail once you are satisfied, and trim your tail end.

11.  Continue this process with the rest of your letters.

12. And tada, you have your own custom string art!

I love the shadows created by the strings on the wood!

Happy Crafting!


DIY Geometric Cutout Skirt

Hello World,

If you follow me on Instagram, you’ve probably noticed I have been on a triangle kick lately with my designs and projects. I recently bought a leopard maxi skirt at a thrift store for less than $4 and reconstructed it into a geometric, cutout mini skirt. Check out the tutorial below to see how to make your own:


Tip: For sharper corners on your cutouts, iron your edges down prior to sewing them.

Happy Crafting!

DIY Valentine Decor

Hello World,

My latest Etsy Treasury and this video inspired the DIY project below.

When I began this project, I just started making paper roses, without a plan for what I was going to glue them on. I figured once I made a decent pile of them, it would dawn on me.

After making it through a few episodes of The Originals (I actually like it way more than Vampire Diaries), my coffee table was covered with paper roses and scraps. Fast forward a few days, and those paper roses were still piled on my coffee table, waiting to be utilized.

I wanted to glue them to something inexpensive, so I went thrift shopping and to a dollar store (where I picked up a shelf liner). I originally was going to glue the roses to the shelf liner, but just ended up making more roses with it. I just love the textured roses!

Fast forward a few more days and it dawns on me. I have a pizza box in my recycling bin. I could glue all these roses to it instead of a canvas. Thankfully one of my New Year’s resolutions wasn’t to avoid carbohydrates. Check out the inexpensive tutorial below:

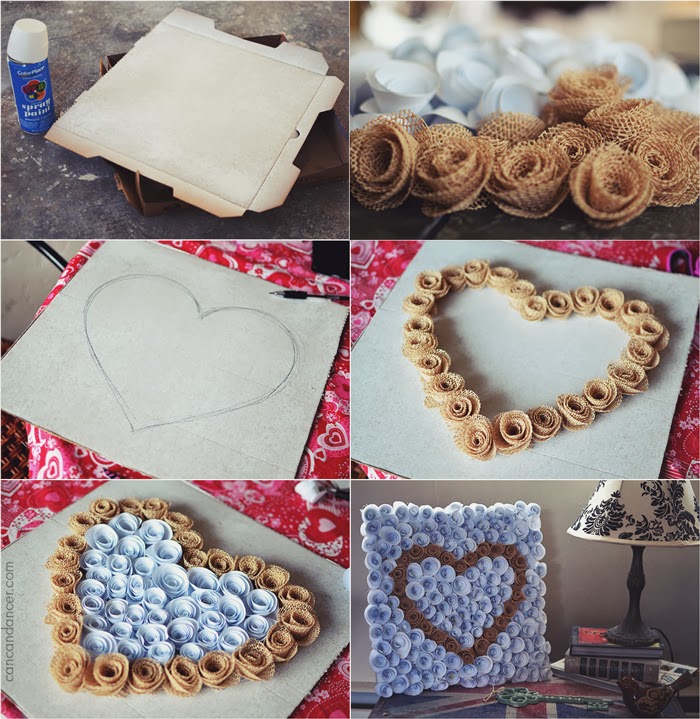
1. Gather your supplies: paper or various materials (lace, burlap, a shelf liner, etc), a hot glue gun, glue sticks, scissors, a base to glue the roses to (hello pizza box!), and spray paint.

2. Make all your roses by cutting out paper swirls and twirling them into a rose shape. Check out this video tutorial for a better explanation.

3. I spray painted the lid to my pizza box white. This way if there were gaps between my roses, the brown cardboard wouldn’t be visible.

4. Trim your cardboard, draw out your design, and start hot glueing your roses down.

5. Continue glueing until the cardboard is completely covered.

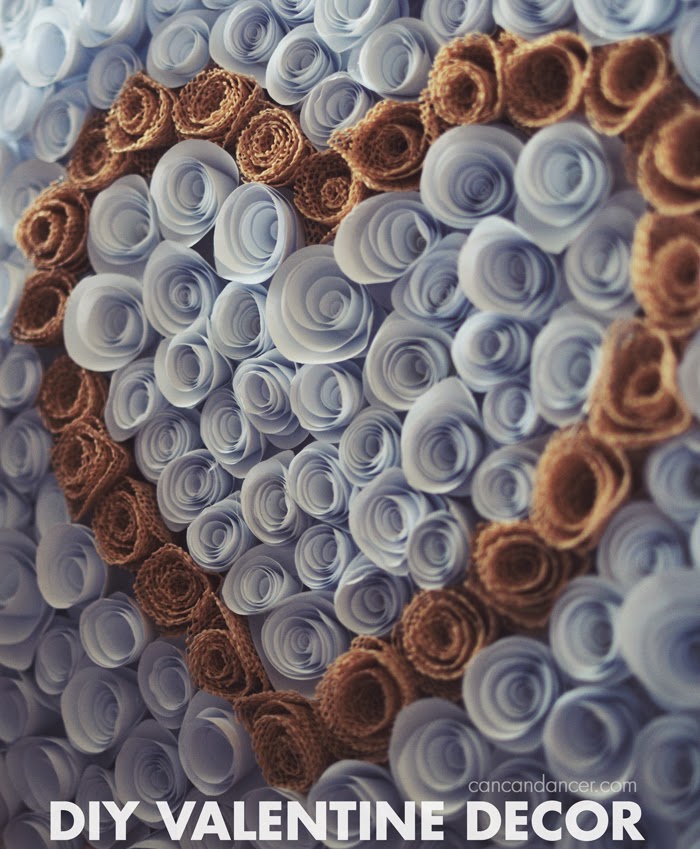
6. Tada! You have some super inexpensive Valentine decor!

I think I’ll make another version of this, and glue burlap roses to some old barn wood. Maybe I’ll make a giant cursive monogram.

Happy Crafting!