Year: 2013

Twine-wrapped Photo Display

Hello World!

With my new internship, I have my own work area. It was looking rather bland (with just standard office supplies), so I decided to make my own photo display.

I made a symmetrical-style display in the past, but it was tough to get all the ribbon angles exactly the same. This time around, I decided to make one that didn’t need to be perfect and was more sporadic in the wrapping. I chose neutral fabric and twine so my desk doesn’t scream GIRL.

string

Check out below for the instructions:

image-holder1-624x1559

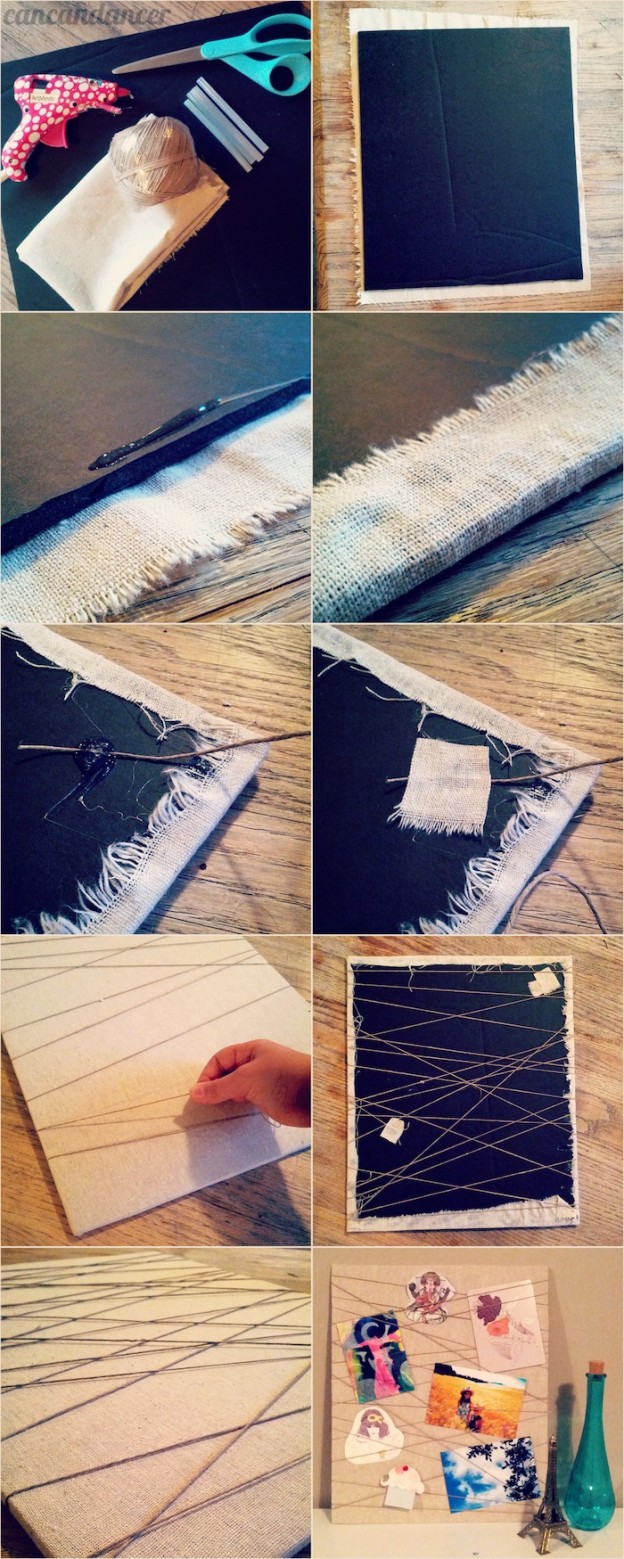
1.  Gather your supplies: foam core, fabric, twine, scissors, and hot glue with sticks.

2.  Place your fabric (right side down) on your workspace, and place your foam core on top of it.

3.  Begin by placing a string of hot glue on your foam core.

4.  Wrap your fabric around your foam core and stick to the hot glue. (If you are worried about burning yourself, push the fabric into the glue with a pencil or chopstick.) Continue glueing and pressing your fabric until it is completely adhered.

5.  Place a pile of hot glue on the back side of your foam core, and place the tail end of your twine into it.

6.  Sandwich your twine and hot glue with a piece of scrap fabric. (This will help to better secure it, once the glue dries.)

7.  Begin wrapping your twine tightly around your foam core. Go in random directions, or form a pattern if you wish.

8.  Once you feel you have enough twine wrapped, repeat step 5 with the other tail end.

9. Allow everything to completely cool. Glue fabric to the back if you want to hide the sloppy backside.

10. Slide photos, cards, ect between your strings, and enjoy!

Happy crafting!


DIY Wedding Guest Book

Hello World,

One of my friends was married last weekend, and she asked me if I would make her a guest book. She wanted a non-traditional guestbook, where each guest can sign a leaf instead of a bookpage. After the wedding, it can become a piece of home decor.

For this project, you will need plenty of free time, patience, and a steady hand.

june-2-intro21

Check out how to make own below:

june-261

1.  Gather your supplies: canvas, frame, acrylic paint, paint brushes/rollers, and chalk/pencil. (I had contact paper, but ended up not using it to isolate areas.)

2.  Head outside or in a ventilated area, cover your work area to protect it from paint.

3.  I bought this frame for $30 (originally $60) at Michael’s. I couldn’t find a simple silver frame, so I bought some spray paint to cover it. I did 3 coats of spray paint, allowing my paint to dry between coats.

4.  Paint your canvas. I used a roller for the grey base to avoid visible brush strokes.

5.  After letting two coats of paint dry, I disliked how the grey seemed greenish. Instead, I made my own dark grey paint by mixing generic black and white paints from Michael’s together.

6.  Determine how large you want your tree to be, and sketch it out with your chalk/pencil.

7.  Paint in your tree body and draw out every single leaf. I numbered each of them to keep track. I ended up with around 150 leaves once I was finished.

8.  Paint inside your leaves. I did two coats of blue paint. TIP: Completely cover your chalk/pencil marks when you paint your leaves. I thought I could just wipe the outlines away, but it removed my grey paint. I had to repaint around the edging of my leaves (which was time consuming).

9.  I added a small heart with their initials, to the tree trunk, with a thin sharpie. Then, frame your guest book.

10.  Tada! If you ship this, I recommend not procrastinating. My shipping cost just as much as the project did because I had to expedite it.

Happy Crafting!

P.S. The two other no-sew tutorials are still coming, I just wanted to blog about this first. 🙂

Tutorial sneak peek

Hello World!

I recently moved and started an internship in North Idaho. Because I moved, I lost access to the camera I always used to take blog images. I have been saving up though and now have enough to buy my own DSLR. 🙂 I’ve been researching different models and brands in my price range, and probably will get a Nikon d5100 (and buy a separate prime lens). If you have any advice or camera tips, please leave a comment below.

Upcoming no-sew tutorials include:

IMG_20130611_211241-624x624

Twine wrapped photo display

IMG_20130602_190543-624x624

Power-tool-free seashell garland

Stay tuned, and happy crafting!