t shirt

DIY Cut-Off Tank

muscleteeintro2

Hello World,

I recently went to Kohl’s and saw some cut-off tanks with weaved armholes for $20+. Instead of buying one, I decided to reconstruct a tee I never wear anymore. This project is a quick way to give an old shirt new life, and it doesn’t require any sewing! Check out the simple tutorial:

DIY Cut-Off Tank

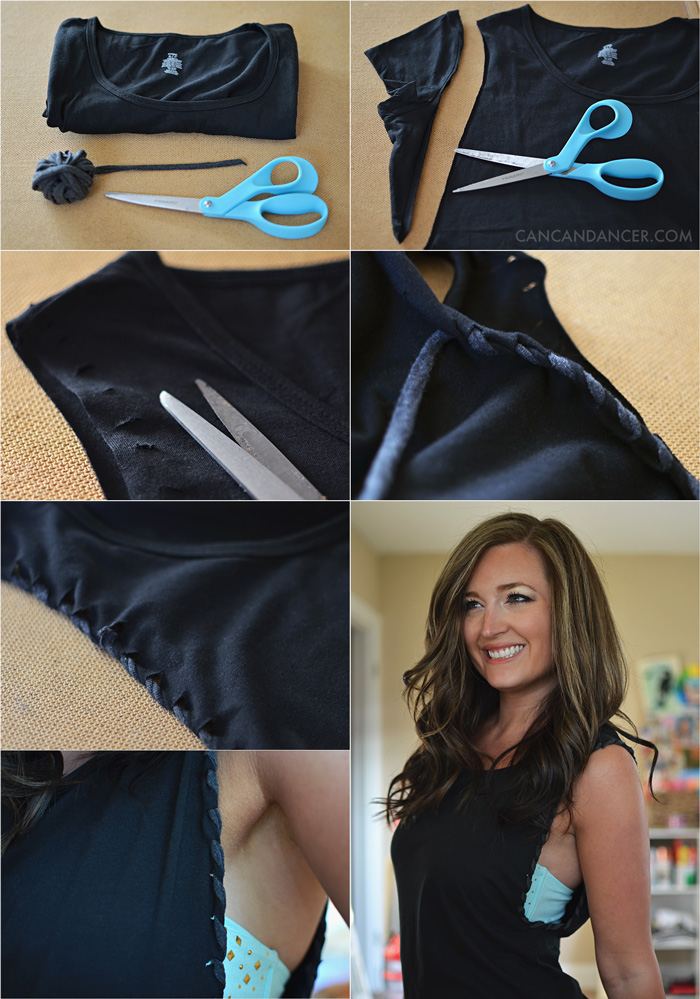
1. Gather your supplies: a t-shirt, scissors, and t-shirt yarn or scrap jersey cut into two long, stretched strips.

2. Cut the sleeves off of your shirt. For an exaggerated armhole, cut more of the shirt away.

3. Cut small, equally-spaced slices along the raw edge of each armhole, at least 0.25″ away from the edge.

4. Starting at the bottom of your arm hole, feed your t-shirt yarn each slice until you reach your starting point. Tie a knot with the other tail end, tails aiming towards the inside of your shirt.

5. Repeat with the other armhole and tada!

Pair it with your favorite bandeau, wear it as a work-out tank, or whatever floats your boat! Want to spruce it up even more? Customize it with a freezer-paper stencil or paint it with water-downed bleach.

Happy crafting!

DIY Bow Tank

bowbackintro

Hello World,

I used to have quite a collection of t-shirts. Last summer, I used 42 of them to make a college t-shirt quilt, but I still have a stack of them left in my “make something with this pile.” Since summer is my hands-down favorite season, and the weather has finally started getting nice where I live, I reconstructed a tee into a bow-back tank.

If you have an old t-shirt to spare, check out today’s tutorial:

tbackshirt

1. Gather your supplies: a t-shirt, scissors, a sewing machine, needle and thread, and fabric dye if your tee was a little too plain to begin with. I bought a few bottles of dye from Darby Smart. You will only need one bottle for this project.

2. Remove the sleeves from your t-shirt. I trimmed a little more than just the sleeves, to create a tank-top shape.

3. Flip over your shirt and cut out the back sections (similar to the photo). Leave the center strip attached unless you want to make a halter top.

4. With one of your back section cut-out pieces, cut out a rectangle.

5. Fold this rectangle in half, and sew along 3.5 sides, leaving a gap so you can turn it right side out. Flip it right side out, and sew the gap closed.

6. Cut a skinny strip of fabric from your scraps. Tie this around the center of the rectangle piece you just sewed. Knot it again, and trim the ends of the ties.

7. Hem the edges of your tank, or leave them raw. My t-shirt was too baggy on the under-arm area, so I took the sides in. I sewed my new side seams with my sewing machine. Hand sew the bow in place on the back of your tank.

8. I found the dye was more vibrant when the shirt was damp vs dry. I got my shirt wet, rung out the excess water, and laid it down on cardboard. I sprayed the front of my shirt with the dye, flipped it over, and then sprayed the back.

9. Hang your shirt outside over something you don’t mind getting dye dripped on (like grass), and allow it to dry. Once it is dry, throw it in the dryer for a few minutes to set the dye and fluff your bow back up.

Happy Crafting!

Braided One Shoulder Tunic

Hello World,

I reconstructed a sweater similar to this a few years ago, but I never made a tutorial for it. Check out the tutorial below to see how to turn an over-sized shirt into a one-shoulder tunic or dress:

1. Gather your supplies: an long-sleeved over-sized shirt, elastic, scissors or rotary cutter and board, pins, a safety pin, and a sewing machine. (You could hand sew this project, it would just take longer.)

2. Lay your shirt flat. Cut off the sleeves and neckline.

3. Take one sleeve, and cut off the side seam.

4. Lay the sleeve out flat.

5. Cut 3 long strips from that sleeve. Mine were each 2.5″ x 18.”

6. Fold each of those strips in half lengthwise and sew, right sides together.

7. Sew the other two strips this way.

8. Place a safety pin at the end of your first strip, and feed it back through the tube you made. This will turn the tube right side out. Repeat will the other two strips.

9. (I don’t have pictures of this step, but take the large portion of your original shirt and sew up the side seams (right sides together) and hem the top of it. This will create a baggy tube top.)

10. If your tube top is super baggy, sew elastic to the back top hem. Stretch the elastic as you sew so that it gathers evenly.

11. Try on your baggy tube top, and mark with pins where you want each of your braid strips to hit. Also note where you would like the strap to connect on the back. I used my bra strap as a guild and just marked a pin there.

12. Remove the tunic, and pin your three strips where your front pins were located.

13. Sew your strips to your top hem. Make sure your seams end up inside the dress of the tunic.

14. Braid your strips and then pin and sew the other ends to the back of your tunic.

Add a belt if your tunic is a little too baggy, and enjoy.

Happy crafting!