summer

DIY Bow Tank

bowbackintro

Hello World,

I used to have quite a collection of t-shirts. Last summer, I used 42 of them to make a college t-shirt quilt, but I still have a stack of them left in my “make something with this pile.” Since summer is my hands-down favorite season, and the weather has finally started getting nice where I live, I reconstructed a tee into a bow-back tank.

If you have an old t-shirt to spare, check out today’s tutorial:

tbackshirt

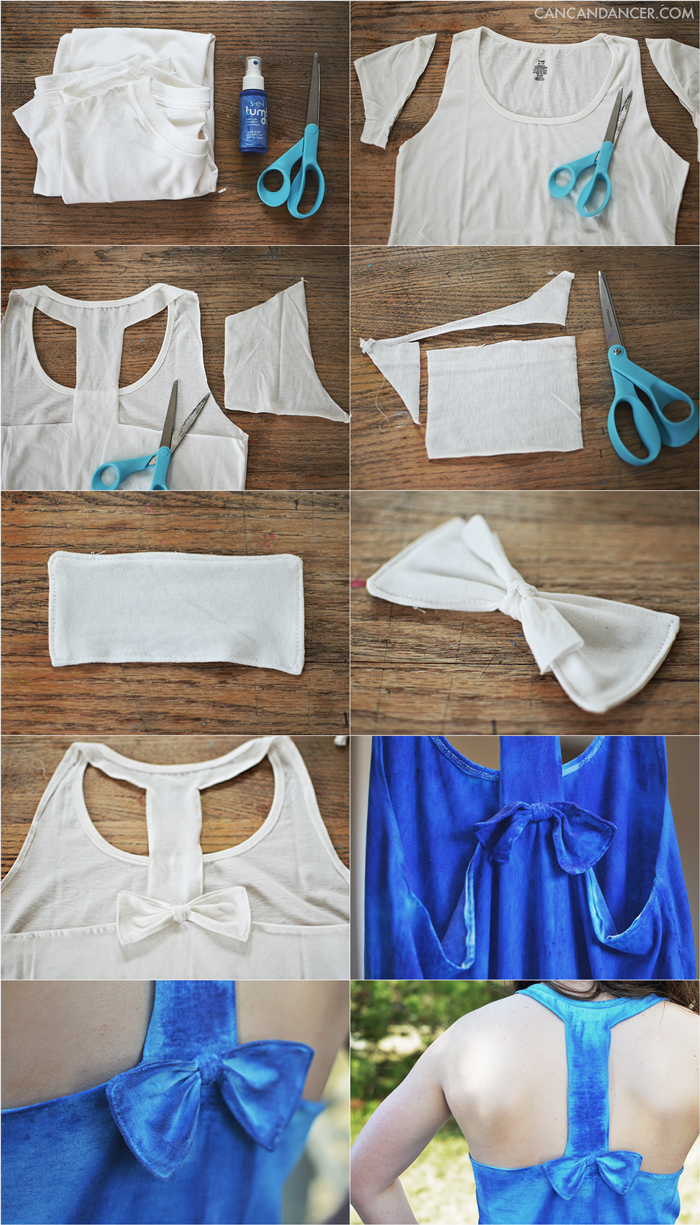
1. Gather your supplies: a t-shirt, scissors, a sewing machine, needle and thread, and fabric dye if your tee was a little too plain to begin with. I bought a few bottles of dye from Darby Smart. You will only need one bottle for this project.

2. Remove the sleeves from your t-shirt. I trimmed a little more than just the sleeves, to create a tank-top shape.

3. Flip over your shirt and cut out the back sections (similar to the photo). Leave the center strip attached unless you want to make a halter top.

4. With one of your back section cut-out pieces, cut out a rectangle.

5. Fold this rectangle in half, and sew along 3.5 sides, leaving a gap so you can turn it right side out. Flip it right side out, and sew the gap closed.

6. Cut a skinny strip of fabric from your scraps. Tie this around the center of the rectangle piece you just sewed. Knot it again, and trim the ends of the ties.

7. Hem the edges of your tank, or leave them raw. My t-shirt was too baggy on the under-arm area, so I took the sides in. I sewed my new side seams with my sewing machine. Hand sew the bow in place on the back of your tank.

8. I found the dye was more vibrant when the shirt was damp vs dry. I got my shirt wet, rung out the excess water, and laid it down on cardboard. I sprayed the front of my shirt with the dye, flipped it over, and then sprayed the back.

9. Hang your shirt outside over something you don’t mind getting dye dripped on (like grass), and allow it to dry. Once it is dry, throw it in the dryer for a few minutes to set the dye and fluff your bow back up.

Happy Crafting!

#throwback DIY (your own in-ground pool)

Hello World!

Boy, am I excited to share today’s DIY project with you! Back when I was 16, my family built our own in-ground pool, and my mom documented the entire process.  (You could say I come from a DIY type of family.)

My parents bought a premium in-ground pool kit for $7,309 in 2006, and the website they bought it from still has similar prices in 2014.  The total project came to $13,929 for the kit, installation, the patio, and the fence. Making this DIY $16,000 cheaper than having someone else do it for us for $30,000. (Final price breakdown at the end of this post.)

The pool kit arrived in a huge box so big, I could stand up in it. It was a fort as is. Sadly, my mom didn’t get a picture of this magnificent box. She did get photos of almost everything else though, so check out the process below:

100_2495

We had a family friend dig the hole for the pool $200. My dad followed the instructions that came with the pool and assembled part of it in the ground. Next, $400 worth of cement was delivered and poured around the pool footings and walls. One of my dad’s friends helped him that day to level out the poured cement.

100_2550.JPG

My dad rented a ditch digger ($70) to put in the natural gas and electric power lines. These lines were used to heat the pool, power the filters, and the lighters. Always call your local utility company before you dig. My parents paid about $400 for: the electric wire, ground grid, and feed wires.

100_2567

Next, all the sand arrived for the bottom of the pool. #Throwback to my natural brunette, 16 year old self.

100_2603.JPG

For the bottom of the pool, we borrowed a cement mixer from a friend and created a cement-sand mixture and spread it evenly on the floor of the pool.

100_2626

My brother and I took turns mixing the sand/cement, and shoveling it into the pool.

100_2630.JPG

Next, we installed the pool liner and the stairs. We also poured level cement to hold the stairs in place.

100_2632.JPG

We suctioned the pool liner to the pool, but it still had wrinkles in it.

100_2634.JPG

We filled the pool with water and checked for leaks.

100_2637.JPG

My mom removed the leftover wrinkles with a plunger. She did this gently to the pool liner, as otherwise she could have caused uneven bumps in the sand under the liner.

100_2685

The trench around the pool was then back filled, and leveled. My parents paid a local company $2,200 to build the patio frame, add the rebar grid, and pour aggregate cement around the pool yard.

100_2871

My parents added a temporary safety fence around the pool, and bought a safety cover.

100_6214

Some of the leftover pool sand was used to make a sandbox for my little sister.

IMG_1202

My mom bought two aluminum pergolas at Costco for $699 each for the pool area. My dad installed the black aluminum fence above himself, and paid $2400 for the materials.

IMAG8767

The pool kit we ordered included a solar heating cover, so we can reduce our natural gas costs for the warmer months in Idaho.

IMAG3500

It took an entire summer for us to DIY it, but eight years later, it still works like new!

100_1908

Price breakdown:

  • $7309 – premium in-ground pool kit (with heater and solar cover)
  • $200 – to a family friend to dig the hole for our pool with his own equipment
  • $400 – cement for pool walls and footings
  • $400 – electric wires, ground grid, and feed wires
  • $250 – piping for the natural gas
  • $70 – ditch digger rental
  • $250 – permits for the pool
  • $150 – miscellaneous wood for the structure and stairs
  • $200 – temporary safety fence
  • $100 – water to fill the pool
  • $2200 – aggregate patio supplies and installation
  • $2400 – black aluminum fence
  • free – borrowed cement mixer, previously owned wheelbarrow and shovels

Cheers!


Rustic Summer Wedding

Hello World,

Last weekend, I went to a friend’s wedding in Northern Idaho. I wrapped their gift in kraft paper, hemp twine and topped with live herbs/flowers. I bought a pack of tags two years ago at Office Depot, and finally found a reason to use one!

I used a thin sharpie to draw out the “Eat, drink, and be married” design, and sprayed the entire package with gold glitter to add some minimalistic pizazz. At first I topped the gift with fresh oregano from my yard, but it wilted very quickly. Right before leaving for the wedding I switched the oregano out for wild daisies.

wedding1

wedding2

wedding3

I only snapped a few photos of the wedding decorations before it got too dark. Luckily, I did snap a photo of cupcakes in the armoire; very clever.

Happy Crafting!