sewing

DIY Halloween Costume #4 – Blue Fairy

DIY Halloween Costume #4 - Blue Fairy

Hello World,

Back when I was in junior high, my mom dressed up as Blue Fairy from Pinocchio for Halloween. For her costume, my mom made her skirt with sparkly non-stretch fabric from JoAnn’s in two shades of blue. She first cut three layers of fabric at different lengths (short light blue, medium-length dark blue, and long light blue) and cut triangles off the bottom edge of each layer. She then hand-sewed all three layers at once to an elastic belt, gathering at points to give the skirt more volume.

She wore a fuzzy blue top (back in elementary school I wanted to wear it so bad, just look at how fuzzy it is), and tied the triangle scraps from her skirt around her waist. She wore fairy wings, blue tights, silver shoes, and carried a wand. To top off her costume, she wore a sparkly, blue wig, which she pinned flowers and bows into.

DIY Halloween Costume #4 - Blue Fairy

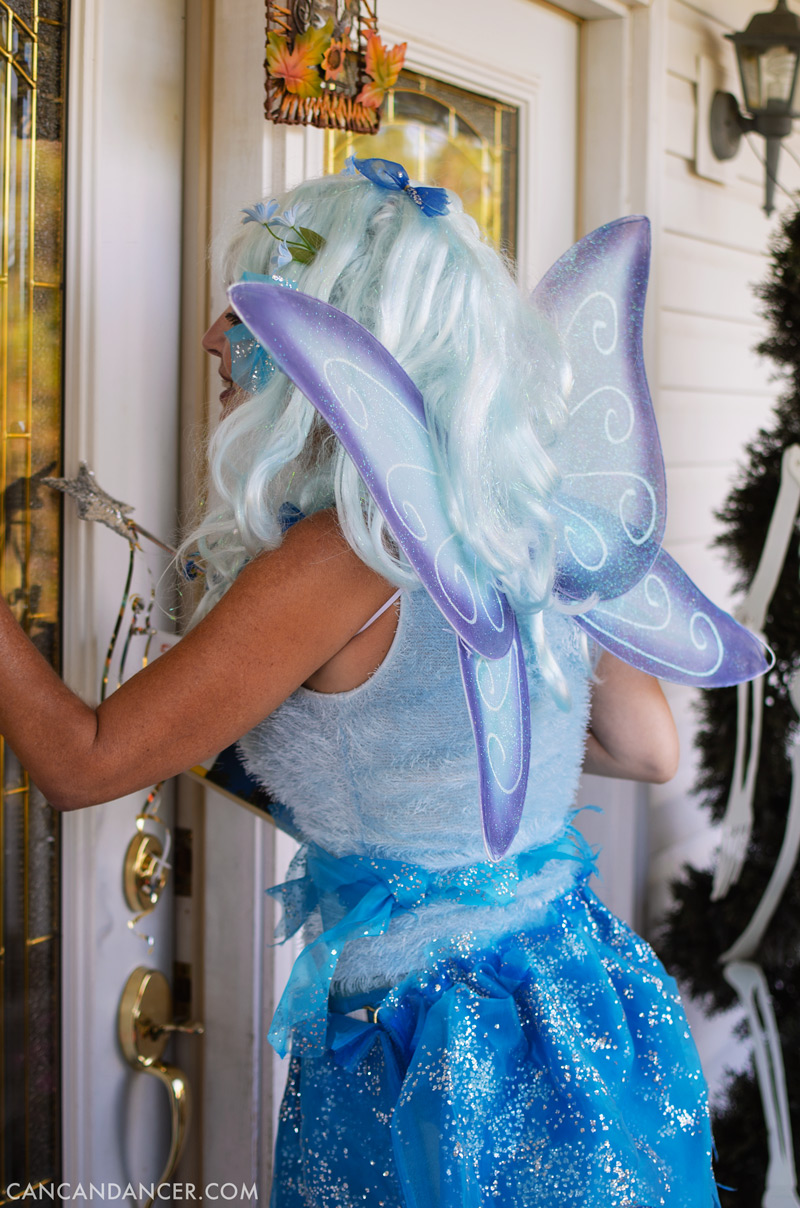
Seriously, look at that fuzzy top. It is so 90’s. So GREAT.

Looking for more Halloween costumes ideas? Well, it’s your lucky day, because I have all my DIY costumes (and decor tutorials too!) listed here.

Happy Costuming!

DIY Bow Tank

bowbackintro

Hello World,

I used to have quite a collection of t-shirts. Last summer, I used 42 of them to make a college t-shirt quilt, but I still have a stack of them left in my “make something with this pile.” Since summer is my hands-down favorite season, and the weather has finally started getting nice where I live, I reconstructed a tee into a bow-back tank.

If you have an old t-shirt to spare, check out today’s tutorial:

tbackshirt

1. Gather your supplies: a t-shirt, scissors, a sewing machine, needle and thread, and fabric dye if your tee was a little too plain to begin with. I bought a few bottles of dye from Darby Smart. You will only need one bottle for this project.

2. Remove the sleeves from your t-shirt. I trimmed a little more than just the sleeves, to create a tank-top shape.

3. Flip over your shirt and cut out the back sections (similar to the photo). Leave the center strip attached unless you want to make a halter top.

4. With one of your back section cut-out pieces, cut out a rectangle.

5. Fold this rectangle in half, and sew along 3.5 sides, leaving a gap so you can turn it right side out. Flip it right side out, and sew the gap closed.

6. Cut a skinny strip of fabric from your scraps. Tie this around the center of the rectangle piece you just sewed. Knot it again, and trim the ends of the ties.

7. Hem the edges of your tank, or leave them raw. My t-shirt was too baggy on the under-arm area, so I took the sides in. I sewed my new side seams with my sewing machine. Hand sew the bow in place on the back of your tank.

8. I found the dye was more vibrant when the shirt was damp vs dry. I got my shirt wet, rung out the excess water, and laid it down on cardboard. I sprayed the front of my shirt with the dye, flipped it over, and then sprayed the back.

9. Hang your shirt outside over something you don’t mind getting dye dripped on (like grass), and allow it to dry. Once it is dry, throw it in the dryer for a few minutes to set the dye and fluff your bow back up.

Happy Crafting!

DIY Geometric Cutout Skirt

Hello World,

If you follow me on Instagram, you’ve probably noticed I have been on a triangle kick lately with my designs and projects. I recently bought a leopard maxi skirt at a thrift store for less than $4 and reconstructed it into a geometric, cutout mini skirt. Check out the tutorial below to see how to make your own:


Tip: For sharper corners on your cutouts, iron your edges down prior to sewing them.

Happy Crafting!