ombre

Make Your Own Constellation Art

starsintro

Hello World,

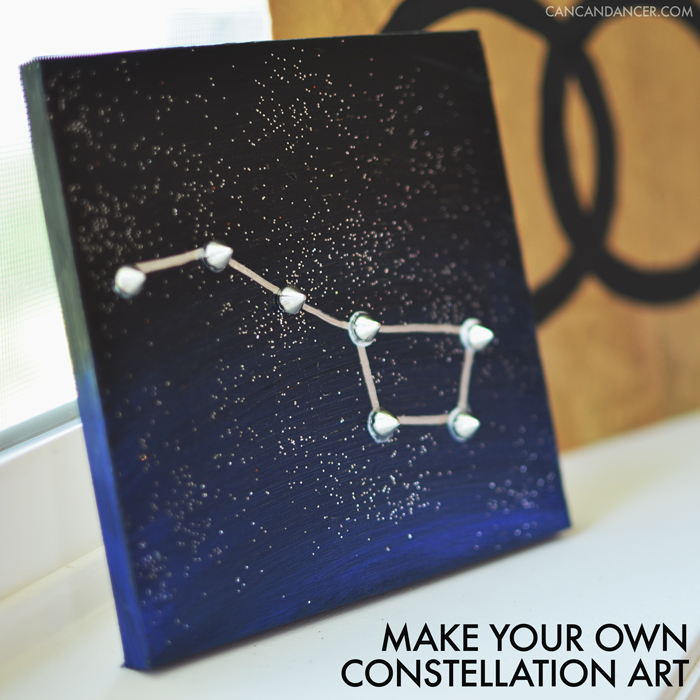
It’s no secret I love anything outer space related and stargazing. Before I discovered my passion for design, I actually wanted to be an astronomer or a physicist. I even was almost going to be a galaxy for Halloween this last year.  To bring a little of the night sky into my home, I DIY-ed some simple wall decor featuring one of my favorite constellations- Ursa Major.

Check out the tutorial to make your own:

constellationart

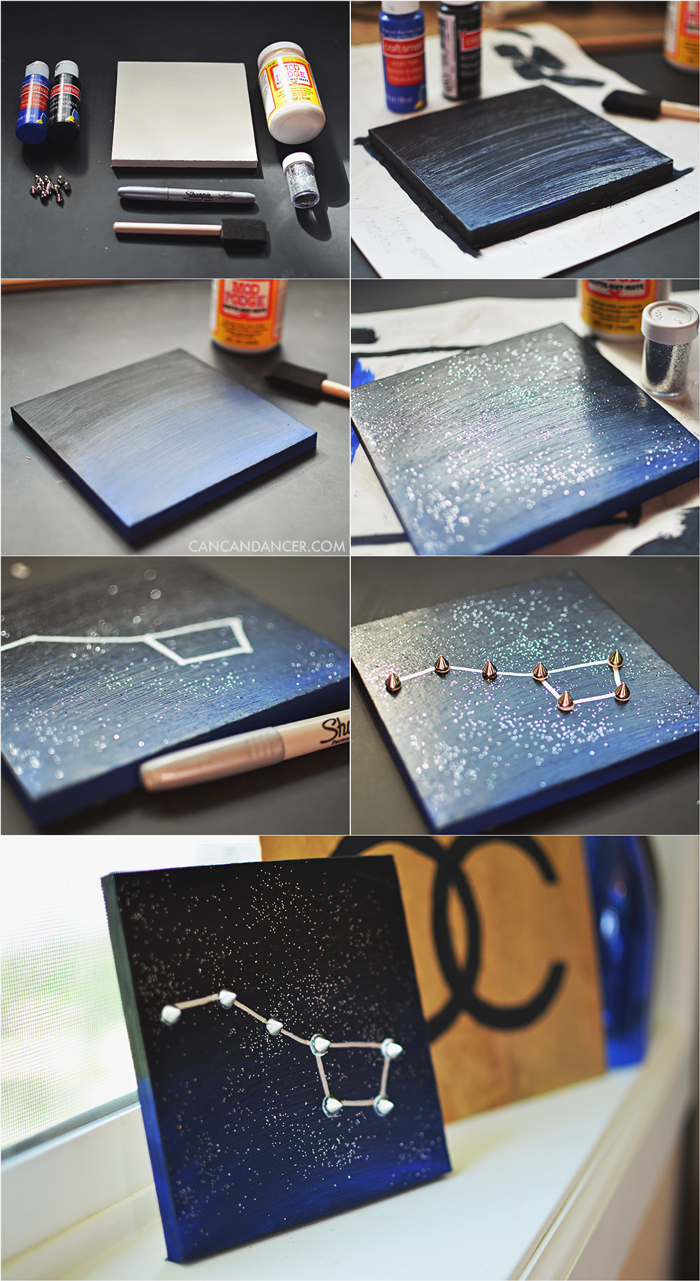
1. Gather your supplies: a small canvas, black and blue acrylic paints, Mod Podge, glitter, a Sharpie, studs, and a brush.

2. Paint your canvas. I painted black paint on the top half, and blue on the bottom half, and then blended them together to create a gradient night sky.

3. Allow paint to dry, and then apply a layer of Mod Podge.

4. Sprinkle glitter onto the wet Mod Podge and allow it to dry. Once dry, add a second layer of Mod Podge to seal the glitter.

5. Once all your Mod Podge is dried, draw out your favorite constellation with the Sharpie.

6. Dip the back of each stud in some Mod Podge, and place it on the canvas at each star location. Allow to dry and enjoy!

If I can get my hands on more small canvases, I think I’ll make a series of these and hang them up in a row. What is your favorite constellation?

Happy Crafting!

Gradient Vase from a Bottle

Hello World,

My favorite craft projects involve repurposed materials. I previously showed two techniques for sprucing up vases with spray paint. Check them out here.

Last summer I found a tutorial for cutting bottles with yarn, nail polish remover, and a lighter- and failed miserably. I blogged about my Pinterest fail, and asked for suggestions to succeed next time around. I decided to give the technique another try, and actually succeeded this time!

Check out how to make your own gradient vase below:

1. Gather your supplies: spray paint and a bottle. If you want to try cutting your vase you also will need: nail polish remover, yarn, sandpaper, and a lighter.

2. Remove all labels from your bottle.

3. Wash your bottle. If you have sticker residue, let the bottle soak in sudsy hot water. Load a scrubby with soap and then have at the sticker residue. Dry your bottle.

4. If you want to cut the top of your bottle check out this tutorial. From my experience, I rotated my bottle more quickly, and for more than 30 seconds. Dull down the sharp edges with sand paper. If you don’t want to risk accidentally lighting anything on fire, skip this step.

5. In a ventilated area, spray paint your bottle. For a gradient effect, spray more towards the bottle, and quickly work your way up the bottle.

6. Allow to dry. In my last photo, I placed the top of the bottle upside down inside the vase portion to help hold my fake flower stems in place.