crafting

Shabby Chic Chandelier/Wind Chime

Hello World,

One of my friends gave me a bunch of keys for my birthday last year and a few more for Christmas this year, and I finally got around to using them to make some home decor.

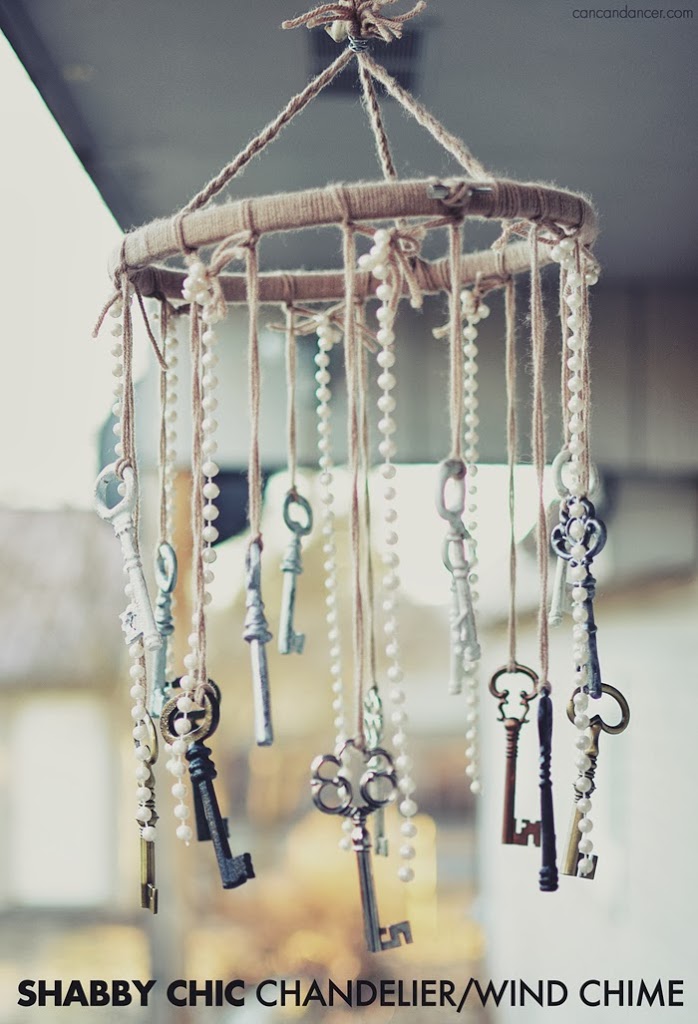
I made a shabby chic chandelier/wind chime with the keys (she got them from Michael’s) and some pearl garland I picked up at a yard sale for $0.50. Below is just the first stage of it. I probably will add more beads, tiers, and lace trim to it as I come across them while thrift shopping.

Check out the tutorial below to see how to make your own:

keys1

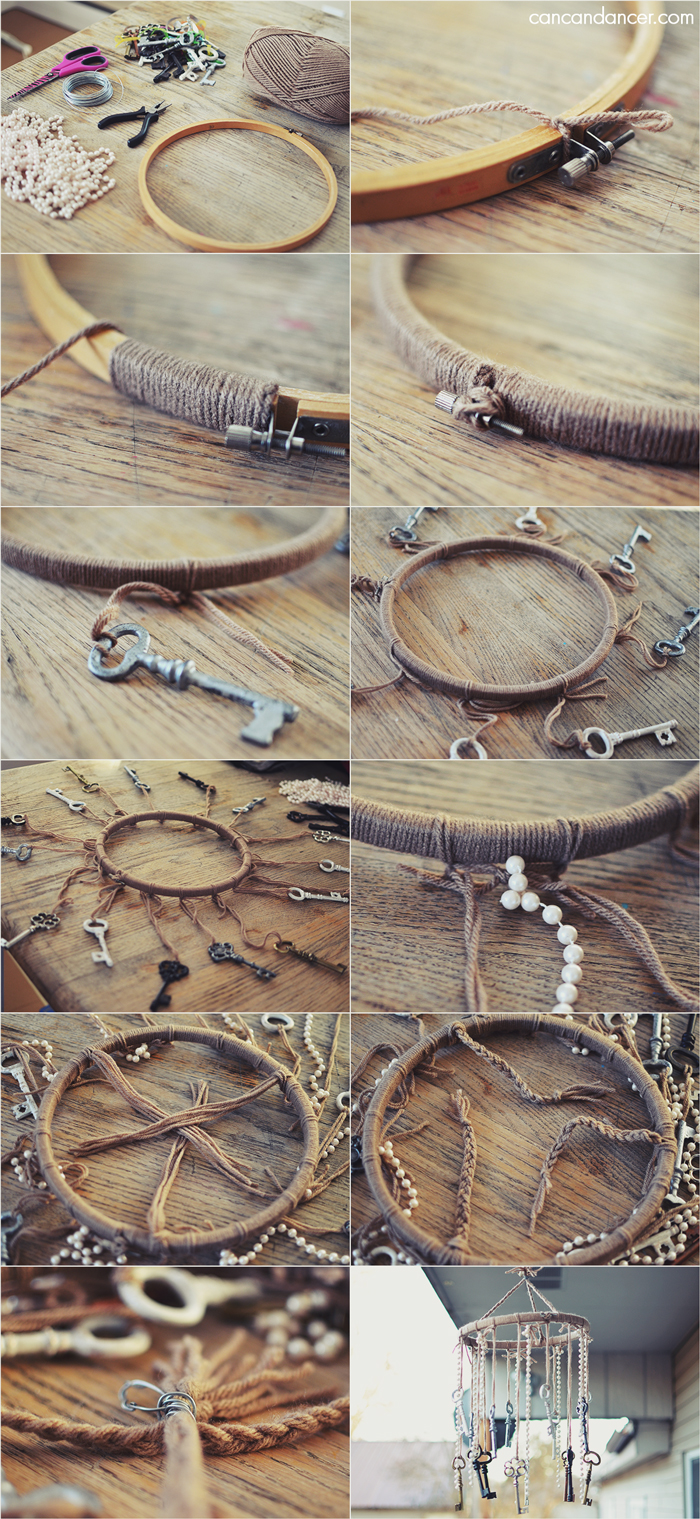
1. Gather your supplies: large keys, beads or pearl garland, scissors, yarn, an embroidery hoop, pliers, and wire.

2. Star off by knotting the tail end of your yarn to your embroidery hoop.

3. Wrap the yarn around the embroidery hoop, covering the tail end as you work your way around the hoop.

4. Continue wrapping yarn around your hoop until it is completely covered.

5.  Loop some yarn through your first key, and pull the tail ends through the loop you created, catching the key in the loop. Tie this first key strand to your embroidery hoop.

6.  Continue with more keys, equally spacing them out. I used the silver/white keys for the shorter tier of my chandelier.

7.  Continue adding keys to your hoop until you are satisfied. I did alternating lengths for my keys.

8.  With the tail ends of each of the key strands, I tied them to their nearest neighbor. I tied my pearl strands to these yarn loops. Trim the tail ends if you wish, but I left mine long in case I decide to add more beads in the future.

9. Cut out 9 pieces of yarn that are all the same length. Place them in groups of three, fold them in half and loop them around the embroidery hoop.

10.  Braid each of these yarn groups and knot the ends. (If you want a more secure chandelier, you can use the wire as your hanging mechanism instead of yarn.)

11.  Bring your three braids ends together and secure them by wrapping wire around them.

12.  I created a small wire loop and attached this to my wire wrapping to be used as a hanging point. Add more materials to your chandelier if you want it more complex, hang, and enjoy!

Happy Crafting!

DIY Slipper Socks

Hello World,

Need a last minute gift idea? Or just want to make a little something for yourself? I made my own slipper socks with scrap fabric and a thrifted sweatshirt, making this a very inexpensive DIY project.

Check out the tutorial below:

slipper-socks2

1. Gather your materials: decorative fabric for the top of the slipper, a thicker fabric (to make these extra cozy! I used a thrifted sweatshirt), pins, scissors, a sewing machine (or needle and thread).

2. Make your own pattern by tracing your foot, or use the pattern pieces I used. Download them here.

3. Fold your decorative fabric in half, wrong sides together. I used a stretch knit, so I didn’t worry about the grain. Place the first pattern piece (the one that looks like a 90’s telephone- see the slight resemblance?) down along the fold. Pin and cut.

4. If you add a half inch of seam allowance around all the pattern pieces, you will roughly end up with a size XL Women’s slipper sock. If you don’t include seam allowance, roughly a size L. For those with smaller feet, just trim the pattern pieces accordingly to fit your foot size.

5. Place the first pattern piece on your thicker fabric along the fold. (I used the sleeve of my sweatshirt.) Pin and cut.

6. Place your second pattern piece (the one that slightly resembles a foot) down on your thicker fabric. Pin and cut through two layers of fabric at the same time. The reason for this is because you will notice the second pattern piece is asymmetrical. This is to accommodate the big toe. Cutting through both layers at the same time helped it so I didn’t end up with two left feet.

7. Repeat steps 3-6 for the cutting out the other slipper sock. When cutting out your second pattern piece this time around though, place the pattern piece right side down on your fabric (so you end up with both feet). You will end up with four pieces per slipper sock, these will make the liner and the shell.

8. Fold your top pieces in half, right sides together. Pin the heel areas closed and sew.

9. This will leave you with asymmetrical loops of fabric.

10. Place your liner fabrics right side together on top of each other.

11. Pin around the entire edge of your pattern pieces.

12. When you get to the heel area, you will have excess fabric. Pinch and pin the heel area down to the second pattern piece.

13. At this point your work will start to resemble a slipper sock!

14. Sew around the entire circumference of your slipper sock.

15. Repeat pinning process with the shell fabric pieces.

16. Place your liner piece inside your shell piece, right sides together.

17. Sew them together, along the ankle area. Leave a small gap near the back seam.

18. Turn your slipper sock right side out via the hole you left.

19. Push your liner into your shell, and sew the hole closed.

20. Repeat with the other slipper sock.

Tada! You have some custom-made slipper socks! If you are worried about slipping while wearing them, just take puffy paint and add some dots to the sole of your slipper socks. (My mom used to do this on my socks when I was little.)

Happy Crafting!

DIY Feather Ornaments

Hello World,

I have a confession. I love Christmas. I love the lights, decorating my tree, playing “Sleigh Ride” by the Spice Girls- pretty much everything involving Christmas. Maybe you can blame it on my past retail experience, but I am one of those crazy people that decorates for Christmas before Thanksgiving.

So with that, I have a very simple DIY project for you! Last weekend, my local Goodwill put out all of their Christmas decor, and I picked up some inexpensive glass ornaments. I already had feathers in my crafting stash, so this was a pretty inexpensive holiday project.

This project is great for creating ornaments to match your holiday decor palette, or could be great to give as a gift. Check out the instructions below:

1. Gather your supplies: glass ornaments, feathers, and scissors.

2. Remove the ornament topper.

3. Gently feed your feather into the glass ornament.

4. Trim feather if it is too long.

5. Replace the ornament topper and hang that baby up!

Happy Crafting!