Month: April 2014

Hand Painted Sunflower Stool

Hello World,

I went thrifting recently and found this solid wood stool for only $4! If you are sensing a pattern here, I like to buy thrift shop items and give them makeovers. The stool I bought had dents and wear on it. Instead of just sanding it and staining the wood, I decided to give it a cheery update.

stool

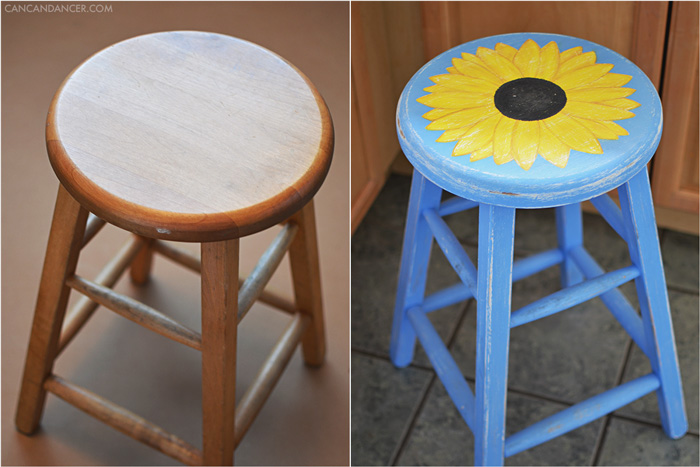
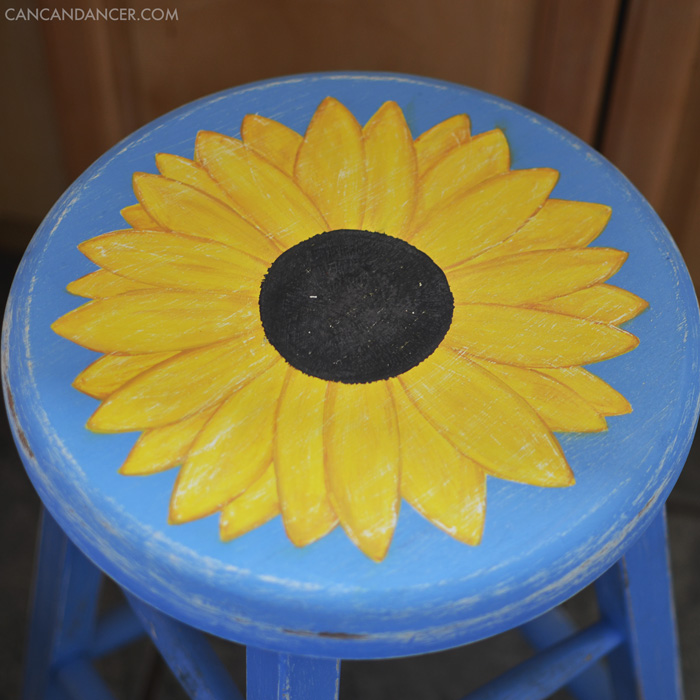
I started by sanding the stool by hand to remove the shine and painted the entire stool with white primer. Next, I applied two coats of periwinkle interior latex paint. At this point I thought the stool looked too perfect, so I took a fine grit sand paper and started sanding the edges of the stool. Some parts I sanded more than others, so the white or original wood would peek through.

I next used acrylic paint and painted my sunflower. I did a base of white first, as yellow paint always seems to be slightly transparent. I used black for the center, and used a fan brush to texturize dark grey paint over it.

After painting my sunflower, I sanded it (going with the grain of the wood) as well to give it some wear. I then sealed it with some clear spray paint.

DSC_0005-1

My mom loves sunflowers, so *spoiler MOM* I might give it to her. If I find another stool at that low of a price, I might make another with a daisy painted on it. Do you like to makeover thrift store items as well?

Happy Crafting!

DIY Oversized Dreamcatcher

dreamcatcherintro2

Hello World,

I usually don’t post about my personal life on here, but today’s tutorial is different. It holds a deeper meaning to me. My grandma (I called her Granny) passed away almost two years ago, and my family was given some of her things. Granny was very bright, loved to read, collected quirky cat figurines, and had doilies all around her home. I have had one of her doilies, and finally found a symbolic way to use it.

Granny liked to focus on the positive, and didn’t let negativity get to her. I find this attitude towards life similar to a dreamcatcher. In some Native American cultures, dreamcatchers are believed to filter out bad dreams, letting only the good dreams through. So I used one of her doilies to make an oversized dreamcatcher, as a happy reminder of her, and to remind me focus on the positive, no matter what life throws at me.

Check out the tutorial below:

dreamcatcher

1. Gather your supplies: a small hula-hoop (mine was from the dollar store), a doily, twine, scissors, various lace trimmings (I found mine at thrift shops), beads, buttons, and fabric glue (not pictured).

2. Pop in your favorite movie, and start wrapping your twine around your hula hoop. Continue until you have completely covered it.

3. Take note of how many points your doily has. Mine had 12.

4. Start by tying a tail end of twine to your hoop. 1/12 along the way of my hoop, I pulled tightly, and looped my twine around my hoop. I repeated this until I had a 12 sided polygon inside my hoop.

5. I continued around a second time, this time looping my twine through the center point of each previously-created polygon side. My doily was large, so I didn’t continue working around the twine spiral. If yours is smaller, continue working your way around. Tie a knot when you reach your stopping point.

6. To attach my doily, instead of working it into the twine spiral, I just looped twine through one of the corners, and tied it to the hoop. I hid my tail ends my wrapping them around the hoop a bit.

7. Attach your various lace trims to your hoop. Either knot them onto it, or fold them over and glue in place.

8. Add any other trimmings to your dreamcatcher. I tied on pearl strands, twine braids, and other beaded strands.

9. To hang it, I looped a piece of trim around the top of my hoop and glued the tail ends together to create a loop. I also added a vintage brooch to the doily of my dreamcatcher.

I haven’t added feathers to mine just yet, as I haven’t stumbled across the perfect feathers yet.

Happy crafting! Be happy!


Thrifted Dresser Facelift

Hello World,

I bought this dresser two years ago for $25 at a thrift store. I liked that it was made of real wood and with some TLC it would be like new again. I even has ‘Massachusetts’ stamped on the back, so I’m guessing that is where it was made. Well, two years passed and I didn’t do anything to it except line the drawers with pretty contact paper.

Fast forward to last week, and I finally decided to give my dresser a well-needed makeover. I have started replacing or updating my mismatch broke-college-student furniture, and am aiming to decorate my room in neutrals with pops of metallic.

dresser2

This dresser needed some love. It had a crooked drawer, and dings and dents like nobody’s business.  I started by removing all the hardware. These drawer pulls in particular left dents in the drawer faces, so using a different set of knobs would mean intense sanding.

dresser

At first, I hand-sanded the drawers, but that was going to take hours, so I borrowed my dad’s electric sander. I used a rough grid sandpaper first to remove the stain and most of the dents. Some of the edges were hard to get with the electric sander, so I folded sandpaper and sanded those areas by hand.

Next, I sanded the entire dresser with a finer grit sandpaper to smooth it out. After sanding, I wiped the dresser down with a damp rag and let it dry. To paint my dresser, I whitewashed it by watering down interior satin-finish paint. (Roughly 1/4 paint 3/4 water in a small bucket.) I did two coats of the whitewashed paint, and spray painted my knobs.

I actually wish I had left the knobs in their original color, but for now I am just letting them be. My dresser matches my room so much better now, and I might go in and sponge darker paint on some of the edges, for a more distressed look.

Happy Crafting!