Month: September 2012

DIY wax scent pods

Hello World! I bought a bunch of candles at Bath and Body Works during their Semi-Annual sale, and have burned all of them down to the very end of the wicks.  There is still a nice chunk of wax in the bottom, so I reused the wax and made scent pods.

I bought a candle warmer at Shopko about a week ago for $9 on clearance, and it came with 2 wax bars in the kit.  I thought I would use up my old candle wax before opening a new wax package. Also, by cleaning the leftover wax out, you can repurpose the glass containers!

Here is a tutorial for making cute wax pods with Dollar Store ice cube trays!

Check out below to make some as well:

sept-6th-tutorial1

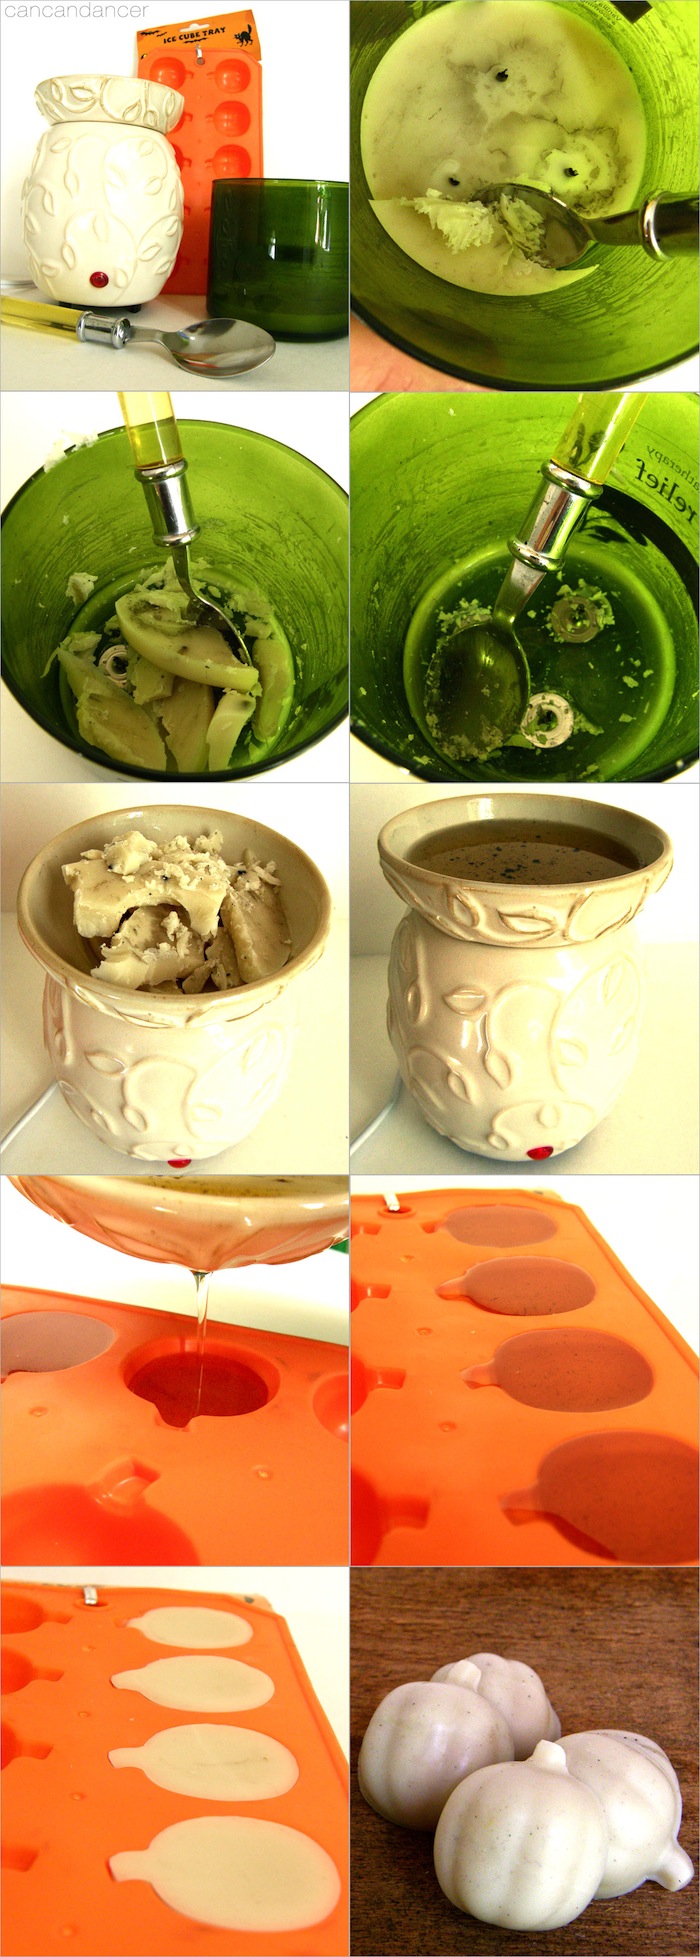
1.  You will need: a wax warmer w/dish, burned down candle, ice cube tray and a spoon.

2.  Start scooping the leftover wax out of your candle with the spoon. If your wax is really strong, use a butter knife instead.

3.   Place all the wax chunks (and the small chunks too) you scooped out into your candle warmer.

4.   Soak your empty candle container and spoon in hot water and soap, and scrub with a brillo pad. Be careful to not get wax down your drain as it can clog your plumbing.  If you are worried, pour the dirty water into an old bottle or pour it through a fine-mesh screen.

5.   Wait for your wax to melt, and the burnt remains should sink to the bottom of the now liquid wax.

6.   Slowly pour the melted wax into the ice cube tray. Wear an oven mitt if your candle warmer dish is too hot.

7.   Allow to cool in the fridge or freezer (depending on how patient you are)  The wax should solidify very quickly.

8.   Pop the pods out and tada!  Whenever you want to use the scent, just place in your candle warmer and enjoy!

You could also melt the candle wax by placing the candle container (prior to scooping) in a saucepan pan full of boiling water and allow it to remelt on simmer.  You then could pour the melted wax straight into the ice cube trays and have less to scrub in the sink. I didn’t do this method because I would rather leave a candle warmer going while I take a shower than have my stove running unattended.

Or is you have a smaller candle just remove the melting plate and place the candle straight on the warmer to melt.  My 3-wick was to large to melt that way- trust me I tried. 🙂

These could be a really easy gift (tied in a cute baggy with a bow) for a birthday or holiday. I reused my candle jars and placed crafting notions/beads inside them.  The jars look so pretty with the lids on my desk!

Happy Crafting!


Glitter Guitar Painting

My dad is the hardest person to shop for. His favorite things are: Corvettes, guitars, and anything relating to computers (mostly Apple.) Being on a college-student budget, I cannot buy him any of those things. He does appreciate the handmade, so I painted him a guitar for his birthday.

I creeped on my Dad’s Facebook and looked at the pictures he had on there because I couldn’t remember what guitars he even had.  I saw that he had an older Fender Strat- an iconic guitar and I went with that.

I first painted the background using cheap Michael’s paint. I would recommend using nice acrylic paint because the black was kinda muddy and mixed weird with the blue. I painted the lightest area first and worked my way out.

I then tried to paint the guitar bright yellow, but my paint was really translucent (even with a dab of white added to it.) I did four coats and was not happy with the streaks.  ( I even was using nice yellow paint!) I then covered the yellow body of the guitar with Mod Podge and poured glitter on top of it. (I first tried to mix glitter and Mod Podge together, but it would take 4-5 layers to cover it completely.)

I did two layers of the Mod Podge and glitter and let it dry out in the sun.  I then painted the fretboard and the pick-guard. (I know they aren’t perfect, my paint coagulated and my hand was not steady at all that day.)

The painted guitar areas looked really flat next to the glitter, so I did a layer of glossy Mod Podge over it.  Because my hands were’t very steady, I knew it would be impossible to paint the strings, so I instead hot glued 3 wooden beads to the dry canvas, and looped silver elastic thread through them.  Next I hot glued the tail ends to the back/top of the canvas. (Yes I know electric guitars do not have knobs typically, but it does the job.)

It is super shimmery in the sun, and is less orangey in person.  Imagine what other paintings could be fixed/updated with glitter!

Happy Crafting!

PS Happy Birthday Dad!  I love you!

Moo MiniCards!

I received an email from Etsy saying I could receive 100 free MiniCards for my store.  They just arrived today!  They came in a cute box, with 20 of each of my designs.  With the MiniCards, you are able to pick up to 100 different designs if you want, but I just stuck with 5.

If you have an Etsy store, I would recommend getting some too!  The shipping was only $5 and they are really nice quality.  The font and images are really crisp, and the cardstock is nice and thick.

I probably will order from them in the future due to the quality. I usually print my own at home or at Office Depot, but the image quality and paper thickness is never as thick as I would like.

To get your own: click here.

They were free (except shipping) because they have the Etsy logo on them.

PS. I was not paid in anyway to talk about these, I just was really excited about them. 🙂