Year: 2011

Nightstand Makeover

I found this nightstand at a thrift store for less than $10.  I thought it was a steal since it was made with real wood and not particle-board.  It needed some work though.  It was scratched, nicked, and not so pretty in some areas.

I sanded the nightstand, and filled the imperfections with wood putty. Next, I sanded it again, and rolled on two layers of primer.  I then painted the body grey, and the drawer a pretty periwinkle color.  After looking at it, I freehanded a design on the top with a scribe paintbrush.

The paint was leftover from a sculpture I made, and since the paint was outdoor latex-based paint, it hasn’t chipped yet.

makeover2

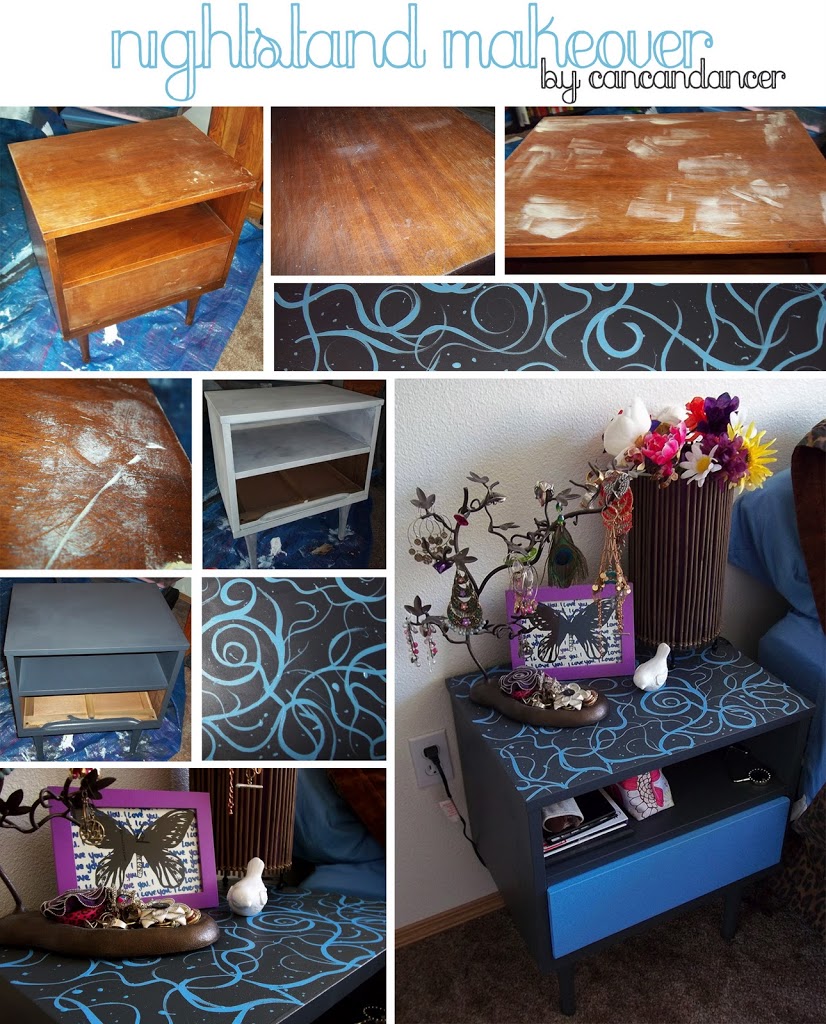
The butterfly print is from my printmaking class, from another student when we had a print exchange.


Recycled Desktop Organizer Tutorial

I had tins, pencil bags, and drawers with so many writing utensils in my apartment.  I went through them finally, and half of the pens were already dead!  Look how many I still have left!  With all of these, I wanted a better way to organize them, so I made my own desktop organizer.

1.  Gather your materials: used paperboard boxes (cereal, cracker boxes, ect.), Modge Podge or other water-based sealer, scissors, and paper or magazines to cover the the final structure.

2.  Cut the box apart into long rectangles.  (It helps if one of the sides still has a box flap on it.)

3.  Roll the cardboard pieces into cylinders.  If there is an original box flap still attached, it is easier to glue it together.  Glue the pieces together by overlapping.

4.  Trace the cylinders to get sturdy bases.

5.  Cut the base circles out, and glue them to their partner cylinders.  Glue the cylinders together, and then cut out magazine or paper pieces for covering.  To cover, first put Modge Podge on the cardboard, place the image on the glue (making sure to avoid bubbles), and then brush Modge Podge on top of the image to seal it.  Continue until entirely covered.

Here is the another organizer I made.  Now it’s so much easier to find a pen.

Vintage Dress Makeover

I bought this dress at Goowill for $2.99.  I liked the soft texture and the print.  I recently got a pinterest account, and found a cute tutorial by Sweet Verbena: link.  It seemed fast and simple, so I tried it out.

Here is how my version turned out.  I made a dress version instead (mid thigh length) of a shirt, and cut a good foot or so off of the bow. (My fabric is stiffer than hers.)  I think I want to change the straps to a lighter color, like a light pink or a cream to make it seem more feminine.

BTW: I promise the dress is even on the bottom hem, its just hanging funny.